
This tutorial presents the end-to-end process to upload an ESRI shapefile into a PostGIS table using QGIS. For these steps to work you need to have PostgreSQL + GIS installed on your system. Otherwise do that first.
This process involves the following 5 steps:
- Step 1: create the database
- Step 2: create the user and grant privileges
- Step 3: upload the shapefile in QGIS
- Step 4: upload the shapefile from QGIS to PostGIS
- Step 5: (Optional) Access your new table
Step 1: create the database
I assume you are running Linux, but if you are not, just find the way to access your PostgreSQL via command line.
sudo -i -u postgres
psql
Once you are within the psql command line, create a database called open_data first to store our spatial data, and make it GIS compatible.
create database open_data;
\c open_data;
CREATE EXTENSION postgis;
As you can see using the \dt command (to list all relations in the current database), PostgreSQL has created the public (default) schema within the open_data database. Remember that in PostgreSQL, a database contains one or more schemas, which in turn contain the tables you care about.
\dt

 Schema |      Name       | Type  |  Owner
--------+-----------------+-------+----------
 public | spatial_ref_sys | table | postgres
(1 row)

Step 2: create the user and grant privileges
First, let’s create a user called usr_open_data
create user usr_open_data with password 'passw0rd=';
Now comes the tricky part of granting enough permissions so that your new user can actually do what it needs to do.
GRANT USAGE, CREATE ON SCHEMA public TO usr_open_data;

ALTER DEFAULT PRIVILEGES IN SCHEMA public GRANT UPDATE, INSERT, SELECT, DELETE ON TABLES TO usr_open_data;

ALTER DEFAULT PRIVILEGES IN SCHEMA public GRANT SELECT ON TABLES TO usr_open_data;
Step 3: upload the shapefile in QGIS
I’m currently using QGIS 2.18, but the same process has worked with older versions as well.
If you do not have it installed yet, install QGIS desktop. For older versions, you may have to also install the QGIS database manager plugin as well, but if your installation is recent enough, the DB Manager Plugin is officially part of the QGIS core, so you are basically done.
Open QGIS desktop.

Now, let’s load the shapefile data. I am using the map of bus stops in Montreal (openly available online). You can also download the file I am using for this tutorial on my GitHub repository.
Inside QGIS, either do Layer > Add Layer > Add Vector Layer or Ctrl + Shift + V
Browse to your .shp (or .shx) file and click open

The shapefile should be loaded: you should be able to see all the bus stops of the city of Montreal. Click on the identify features button.

You can click on any dot from your map: the associated information will load on a new panel to the right. It is this extra information, combined with the geometry of each feature, that we are going to upload to our open_data PostGIS database.

Step 4: upload the shapefile from QGIS to PostGIS
In the Browser Panel to the left, right click on PostGIS, then New Connection …

If you have created your database and user using the same values as in this tutorial, this is how you would edit the information to create a new database connection. I have called mine open_data_connection.

Click on Test Connection to make sure that it works, then save.
In the top menu, select Database > DB Manager > DB Manager

In the new window, navigate to the public schema of your new data connection. In the Privileges section of the Info tab, notice that usr_open_data has enough rights to actually be useful.

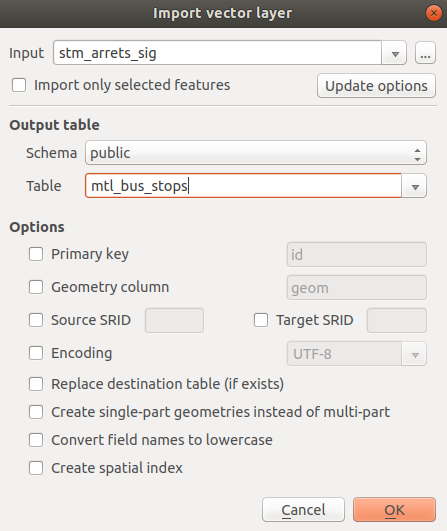
Click on the Import Layer/File button

In the new window, add the name of the new table that you want to create to store your shapefile data, then click OK. The import could take a few minutes depending on the size of your data and the speed of your connection.
Remark: For more advanced users, if your shapefile SRID does not match the SRID you need for your PostGIS table, here is the time to assign your source and target SRIDs. If you do not know what an SRID is, you can happily skip this detail.
And we should be done!

Step 5: (Optional) Access your new table
Either go back to your psql command line console. The \dt command now displays the new table we have created through QGIS.
\dt
                List of relations
 Schema |      Name       | Type  |     Owner
--------+-----------------+-------+---------------
 public | mtl_bus_stops   | table | usr_open_data
 public | spatial_ref_sys | table | postgres
(2 rows)
You can SELECT, INSERT, etc now.
Or use PgAdmin, my favorite tool to explore GIS data
